Utilizing a local development environment is crucial for web developers, but it's not well documented. This guide to setting up MAMP will show you how to create your own PHP development server & how to use MAMP efficiently once you're all setup.
This tutorial will walk you through setting up MAMP so you can take advantage of all the perks of having your own local PHP development server. While this workflow is guided towards folks using a Mac, the steps of the process are almost identical on other platforms. Having your own local development environment allows you to quickly plug through building a website or application without needing to consider all implications of having an accessible product online. We'll show you how to get started with the free version of MAMP, but it should be noted that the Pro version is pretty inexpensive and streamlines your workflow quite a bit. With that said, let's get started showing you how to use MAMP so you can get coding and testing websites like a boss!
Setting Up Mamp - Download & Install
The first step to setting up MAMP will be to download the latest version of MAMP (which is available at www.mamp.info). The only other application you'll need will be a simple text editor to manage the code. Text Wrangler, Sublime, TextMate, Jedit, or Coda would all do the job well and you could always just use Terminal if you're really hardcore. Once you've downloaded MAMP, click to install (you know the drill). After you've installed, take a quick look at the app in your Applications folder. You'll notice that the app is in a folder structure and for future reference it's important to know that the htdocs folder is the default home of your local development environment. The index.php file is what you'll see as soon as you start it up.

What Exactly is a Local Development Environment?
What we're basically doing is creating our own "internet" on your computer. The primary advantage that we're utilizing is the privacy and efficiency that this allows. By having your own "internet" running (also known as a local server or local development environment), you don't need to worry about clients monitoring your revisions or even worse - breaking some part of a live website. The concept of a local testing server sounds complex, but really it just gives coders exactly what they need - Practice and privacy.
While the Mac version is called MAMP, the same functionality is offered on other platforms as "WAMP" or "LAMP".. you may notice a theme in the naming of these apps. In fact, the name tells you exactly what it is - Mac Apache Mysql PHP. Those last three are obviously the important ones here and if you don't know, those are the basic building blocks of a large majority of websites on the internet. Simply - Apache is your testing server, MYSQL is your database, and PHP is the coding language (which is since most major CMS's run on a PHP backbone - Wordpress, Joomla, Drupal, CodeIgnitor etc.). While that's obviously a simplistic explanation of how a PHP development server works, it does cover the functional aspects and brings us to an inherent problem you may be asking yourself.
IMPORTANT: When running the MAMP application, you are broadcasting a network. If you are connected to the internet while you're broadcasting, you're leaving your door WIDE open to hacker types.
Securing Your PHP Development Server
All MAMP applications come setup with the same username and password (hint: They're both "root"). While you ideally would never have your Wifi turned on while you're running MAMP, it's best to assume that might accidentally happen. As you can probably imagine, "broadcasting" your network to the public with a default user and password that would be any dev's first guess would be a bad idea. So the final step in our tutorial is addressing that problem.
Go ahead and turn off your wifi and start MAMP. Then go to your /Applications/Utilities folder and open up Terminal. If you're not familiar with Terminal, don't be scared - just take your time and make sure you input this one part correctly. You're basically inputting where your app is located on your computer, then setting your new password in that last chunk. From your root, you'll need to type...
/Applications/MAMP/Library/bin/mysqladmin -u root -p password [NEWPASSWORD]
Once you hit enter, you'll be prompted for the current password (which is "root"). As long as you don't get an error, you've successfully reset your root users password. The next file you'll need to edit is "config.inc.php" that can be located at /MAMP/bin/phpmyadmin/config.inc.php. Open that file with your trusty text editor and look for the line that reads $cfg['Servers'][$i]['password'] = 'root'; . It should be near the 86th line down. Change that "root" to your new password and save.
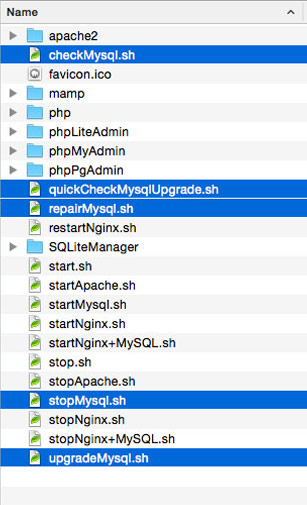
The last few files that you'll need to update are located in /MAMP/bin/. The file names are checkMysql.sh, quickCheckMysqlUpgrade.sh, repairMysql.sh, stopMysql.sh, and upgradeMysql.sh and it should look awfully similar to the image that's attached to the right. These files (as you can probably gather) handle the stopping, starting, etc. of MAMP and that's why they're important to edit. If you don't get around to fixing these, you can have a network running that you're not even aware of... Which obviously isn't good (ps. I've also heard of some setups that require you do the same change to "bin/mamp/index"). Now each of these files will have a line that reads -u root -p root. This is simply a block stating "Ok, this is the user and this is the password". When replacing the "root" password here, you do need to do one thing slightly different. When you replace the password, remove the space between "-p" and your new password (it should read -pNEWPASSWORD). Once you've edited these files, you have properly reset your root password and you're officially done setting up MAMP. Now, let's crank it up!
How to Use MAMP - Start it Up!!
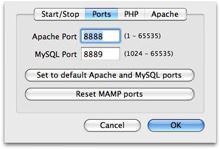
You should have everything running now, so let's cover how to use MAMP itself. First - keep in mind that you still want to turn your network connection off when you're running MAMP. Resetting the password will allow you to remove your "low-hanging-fruit" status, but you still don't want to broadcast publicly. In order to keep your URLs clean, you'll want to remove the ":8888" from your URL. To do that just open up MAMP preferences and click "Set to default Apache and Mysql ports" (see picture). This allows you to tailor your URL structure like you would on a live website. You'll also notice that you can change your document root under the "Apache" tab (otherwise it defaults to /MAMP/htdocs as we mentioned earlier.
Every setup is a little unique and if you'd like a video walk-through, check out the step by step process courtesy of Jono Young (@chsweb) posted below. Once everything is setup properly, you'll have a functional php development server for you to practice all your coding awesomeness on... HTML, Wordpress, Drupal, Joomla, whatever you want. Now pat yourself on the back and getting working on that web project.
If you have any tips on setting up MAMP, please drop them to us on your favorite social network. If you found this tutorial helpful, please feel free to share some love with the buttons below. As always - Thanks for stopping by.
