A brief author bio helps blog posts on several fronts & in this tutorial we'll show you how to create a Joomla author box from scratch. That means more blog content, added credibility, and no extra work for your clients!
Before moving ahead, let's note the difference between a user and an author - because it's a distinction not often made. If you're logging into the back-end of a site, you're using "user" credentials and it's that "user" that functionally authors a post. Since "user" details are info you generally want to keep private (for obvious security reasons), this leads us to a rational problem - How do we display author info, while not displaying user info? This is the basic hurdle we'll be addressing in this post and luckily it's not as tough as you may think.
Why is a Joomla Author Box a Solid Addition?
Author bio's give blog posts a personal feel and add credibility to bot the info and author. In a world where we're constantly inundated with media it's hard to believe content that doesn't at least have a name attached and while Joomla! does offer that, a picture and brief bio really are really helpful. Authorbox's also give a natural point of progression to the "hard ending" of a blog post. Once you've finished an article, a reader asks themselves "What's next?". From a UX standpoint it's not even critical that the reader cares about the bio per se, it's that they're looking for more. Otherwise the default response will obviously be "Yup - We're done here". This is the same psychology behind the much beloved "Call to Action". Put simply, if you never invite the reader to learn more, they'll never think to. While that explanation may seem overly philosophical, I believe it's a decision we all make intuitively... We just do it really quickly. For the most part, I believe this is why clients love the idea of including author bios at the end of blog posts.

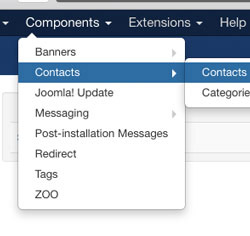
How do we pull this author bio info? While some third party content managers like K2 or Zoo handle it differently, we're going to use the built in contact menu to collect and disseminate author info. If you haven't really used that tool before, start by clicking the contact button at the top of your back-end and create a contact with all the author information you want to display. In our example we'll be using the name, image, website, and the meta description as the bio snippet. Once you've filled in you user info, select your user, then associate the contact profile to that user (don't use an admin, just to be on the safe side). Now that we've got the "user" attached to the "contact", let's generate some PHP that will pull the info on command. While it depends on how your theme is setup, this probably means you'll want to edit your content / article sheet. This should be a sub-template, but I'm sure you already know that. On the page you're attaching the bio, we'll want to include the following query towards the top so we can pull the post creator's user ID and use that to display author info. There may be multiple ways to achieve this, but the below code is how we did.
$jomauth_article =& JTable::getInstance('content');
$jomauth_article->load(JRequest::getInt('id'));
$jomauth_authorid = $jomauth_article->created_by;

$db =& JFactory::getDBO();
$query = "SELECT * FROM #__contact_details WHERE user_id = " . $jomauth_authorid ;
$db->setQuery($query);
$jomauth_contact = $db->loadAssoc();
Which Author Bio Parameters Do We Need?
While the previous chunk of code did the heavily lifting, it didn't pull the info we want to echo. This is because it's important to first define exactly what info you'll want to display. Although we could clearly pull it all, specifying the exact elements we want is what retains a little security. Think of it like cracking a door to let your friend through. In our case, we're looking to display the author's name, profile image, meta description (which will function as our bio), and the contact web link (which will be the link back to the contact's full profile). From a security standpoint, since we're only querying these four elements and the user ID that associates them - that's the only information being exposed. With all that in mind, we're looking to pull those 4 elements and display them in the simplest way possible.
$jomauth_name = $jomauth_contact['name'];
$jomauth_img  = $jomauth_contact['image'];
$jomauth_bio  = $jomauth_contact['metadesc'];
$jomauth_web  = $jomauth_contact['webpage'];

echo "<img src=\"$jomauth_img\" />";
echo "<div>" . $jomauth_name . "</div>";
echo "<p>" . $jomauth_bio . "</p>";
echo "<a href=\"$jomauth_web\">Bio Link</a>";
Finalize Joomla Author Box Code & Add Styling
If you're following along, I'd run your code at this point to make sure it's not provoking any errors. As long as your info is showing up, you should be all clear to move ahead. If you're not, I'd give your server a restart and check your results in Firebug. Now it's time to format your content. While the classes and layout depend on your individual CSS, we've included our method (based on UIKit) so you can get a general idea of what we're trying to do. In the simplest terms - Just make yourself a box, float the image left, then let the text elements stack with the link button last. Again - How you manage the CSS is up to you, but let's show you what the entire query would look standing on it's own.
<?php
// cant touch this
defined('_JEXEC') or die('Go Away');

// pull user id
$jomauth_article =& JTable::getInstance('content');
$jomauth_article->load(JRequest::getInt('id'));
$jomauth_authorid = $jomauth_article->created_by;

// pull author fields
$db =& JFactory::getDBO();
$query = "SELECT * FROM #__contact_details WHERE user_id = " . $jomauth_authorid ;
$db->setQuery($query);
$jomauth_contact = $db->loadAssoc();

// split author array into variables - name, biopic, meta desc (as brief bio), and weblink (back to author bio page)
$jomauth_name = $jomauth_contact['name'];
$jomauth_img  = $jomauth_contact['image'];
$jomauth_bio  = $jomauth_contact['metadesc'];
$jomauth_web  = $jomauth_contact['webpage'];

// display and style content
echo '<div class="uk-panel uk-panel-box uk-panel-box-secondary uk-margin-large-top">';
echo "<img src=\"" . JURI::base( true ) . $jomauth_img . "\" class=\"uk-thumbnail uk-thumbnail-mini uk-float-left uk-margin-right\" alt=\"Profile Picture\" />";
echo "<h5 class=\"uk-text-lead uk-margin-small uk-margin-top-remove\">" . $jomauth_name . "</h5><hr class=\"uk-margin-small\" />";
echo "<p class=\"uk-margin-small uk-text-small\">" . $jomauth_bio . "</p>";
echo "<a href=\"$jomauth_web\" class=\"uk-button uk-button-small\">Visit Bio Page<i class=\"uk-icon-caret-right uk-margin-small-left\"></i></a>";
echo '</div>';
?>
Why Doesn't Joomla! Include Author Info as Core? While I can't say for sure, I'd guess it's just the core team being cautious. Including author names are obviously a core option, but taking the extra step of querying the contact info does take a little bandwidth. From a functional standpoint it's important to keep in mind the whole process we're running through on a page-load - We're pulling the post author's user ID, seeing which contact is assigned to that user, querying the fields we want to use, then echo'ing them. While this isn't exactly brain surgery, it does take a few steps. It's also "best practice" to keep user info as anonymous whenever possible, for obvious security reasons. This is a trade-off you need to make yourself, but we have found this to be a useful addition for clients that have a tough time producing a ton of content since it produces some useful info automatically.
Not Perfect, But Certainly Rounds Out Joomla Posts

While this is generally the point where we pass out high fives, this method certainly isn't perfect so if you see a way of streamlining this approach please comment on this Gist and we'll update as needed. Any suggestions that could increase security or processing speed would be very helpful. It's also worth noting that you shouldn't be using any admin's as post authors, since we're querying an array of contact details. All things considered though, this addition does achieve the objective and while it may need a little tweaking we hope it's a helpful approach for those of you looking to automate the inclusion of a post author bio.
We hope you've found this tutorial useful in creating better Joomla! posts and if you'd like to pass some more useful Joomla! SEO info along to clients, this Joomla! Basics Infographic has helped us out. As previously mentioned, if you have any tips on how we can streamline this authorbox please send them to our Gist and we'll make sure to pass some social love along to anyone with refining tips. If you've found this post helpful or know someone else that would, please share and as always - Thanks very much for stopping by.


